做网站内容管理器要吗下载百度语音导航地图
K8s环境搭建
文章目录
- K8s环境搭建
- 集群类型
- 安装方式
- 环境规划
- 克隆三台虚拟机
- 系统环境配置
- 集群搭建
- 初始化集群(仅在master节点)
- 配置环境变量(仅在master节点)
- 工作节点加入集群(knode1节点及knode2节点)
- 安装calico网络(仅master节点)
集群类型
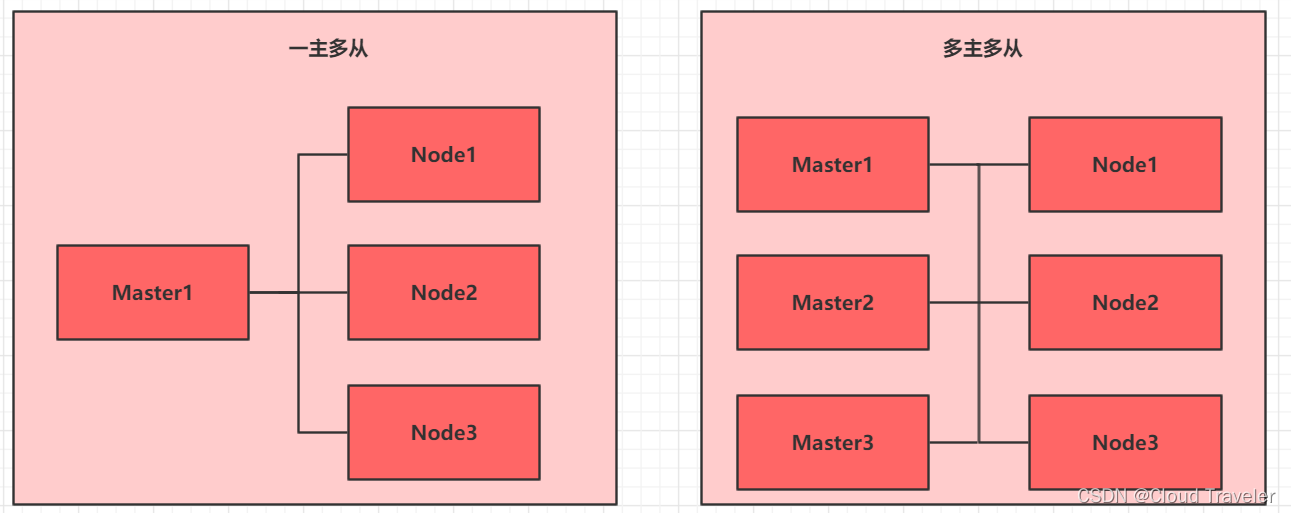
- Kubernetes 集群大致分为两类:一主多从和多主多从。
- 一主多从(单 master ):一个 Master 节点和多台Node 节点,搭建简单,但是有单机故障风险,适合用于测试环境。
- 多主多从(高可用):多台 Master 节点和多台 Node节点,搭建麻烦,安全性高,适合用于生产环境。
安装方式
- Kubernetes 有多种部署方式,目前主流的方式有 kubeadm 、minikube 、二进制包。
- ① minikube:一个用于快速搭建单节点的 Kubernetes 工具。
- ② kubeadm:一个用于快速搭建Kubernetes 集群的工具(可以用于生产环境)。
- ③ 二进制包:从官网上下载每个组件的二进制包,依次去安装(建议生产环境使用)。
环境规划
- 操作系统版本
Centos Stream 8- 安装源可访问阿里云开源镜像站或其他镜像站下载
- 环境需要用到
3台虚拟机,需要联通外网,网卡类型 NAT 或者 桥接。- 本文通过脚本文件快速搭建 k8s集群
| 主机名 | ip地址 | 内存 | 磁盘 | 处理器 |
|---|---|---|---|---|
| Kmaster | 192.168.129.200 | 8GB | 100GB | 2 |
| Knode1 | 192.168.129.201 | 8GB | 100GB | 2 |
| Knode2 | 192.168.129.202 | 8GB | 100GB | 2 |
也可根据自身电脑性能进行内存和存盘的分配,处理器每个节点最少两颗。
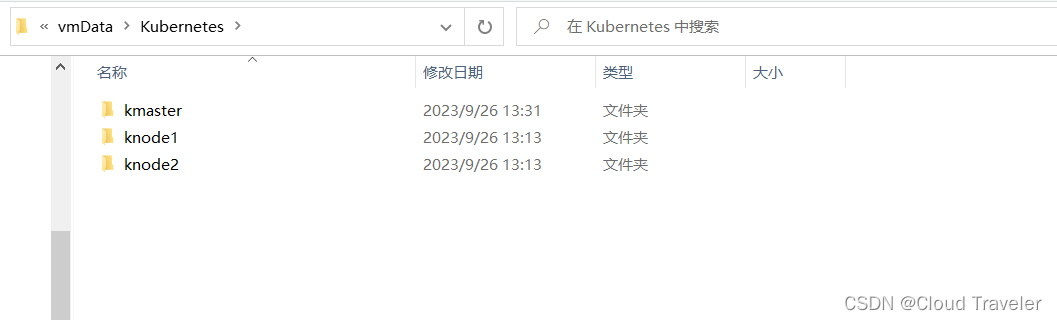
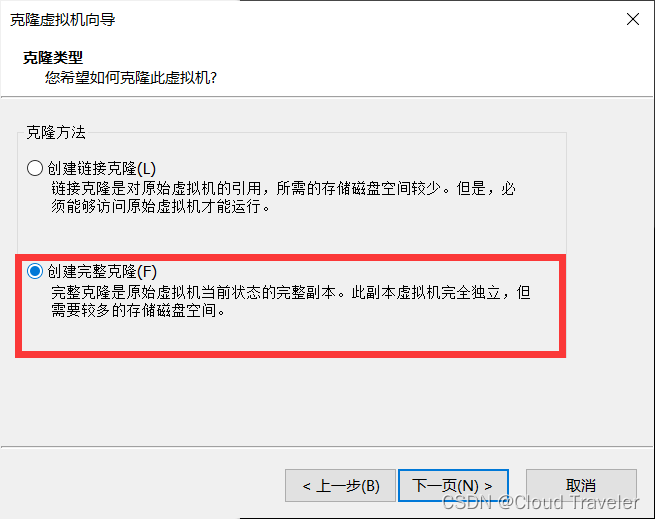
克隆三台虚拟机
准备三个文件夹
一定要注意,是完整克隆
启动,修改3台虚拟机主机名及ip地址。
注意:修改ip地址的时候,看清楚你的网卡名字叫什么,我的是 ifcfg-ens160.
修改完成之后,关机拍快照。
# kmaster 节点
[root@tmp ~]# hostnamectl set-hostname kmaster
[root@kmaster ~]# cd /etc/sysconfig/network-scripts/
[root@kmaster network-scripts]# vi ifcfg-ens160
[root@kmaster network-scripts]# cat ifcfg-ens160
TYPE=Ethernet
BOOTPROTO=none
NAME=ens160
DEVICE=ens160
ONBOOT=yes
IPADDR=192.168.129.200
NETMASK=255.255.255.0
GATEWAY=192.168.129.2
DNS1=192.168.129.2# knode1 节点
[root@tmp ~]# hostnamectl set-hostname knode1
[root@knode1 ~]# cd /etc/sysconfig/network-scripts/
[root@knode1 network-scripts]# vi ifcfg-ens160
[root@knode1 network-scripts]# cat ifcfg-ens160
TYPE=Ethernet
BOOTPROTO=none
NAME=ens160
DEVICE=ens160
ONBOOT=yes
IPADDR=192.168.129.201
NETMASK=255.255.255.0
GATEWAY=192.168.129.2
DNS1=192.168.129.2# knode2 节点
[root@tmp ~]# hostnamectl set-hostname knode2
[root@knode2 ~]# cd /etc/sysconfig/network-scripts/
[root@knode2 network-scripts]# vi ifcfg-ens160
[root@knode2 network-scripts]# cat ifcfg-ens160
TYPE=Ethernet
BOOTPROTO=none
NAME=ens160
DEVICE=ens160
ONBOOT=yes
IPADDR=192.168.129.202
NETMASK=255.255.255.0
GATEWAY=192.168.129.2
DNS1=192.168.129.2
系统环境配置
点击获取脚本及其配置文件
本脚本针对网卡为 ens160,如果不是,请修改脚本网卡指定。
K8s版本 1.27.0
[root@kmaster ~]# vim Stream8-k8s-v1.27.0.sh
#!/bin/bash
# CentOS stream 8 install kubenetes 1.27.0
# the number of available CPUs 1 is less than the required 2
# k8s 环境要求虚拟cpu数量至少2个
# 使用方法:在所有节点上执行该脚本,所有节点配置完成后,复制第11步语句,单独在master节点上进行集群初始化。
#1 rpm
echo '###00 Checking RPM###'
yum install -y yum-utils vim bash-completion net-tools wget
echo "00 configuration successful ^_^"
#Basic Information
echo '###01 Basic Information###'
hostname=`hostname`
# 网卡为 ens160
hostip=$(ifconfig ens160 |grep -w "inet" |awk '{print $2}')
echo 'The Hostname is:'$hostname
echo 'The IPAddress is:'$hostip#2 /etc/hosts
echo '###02 Checking File:/etc/hosts###'
hosts=$(cat /etc/hosts)
result01=$(echo $hosts |grep -w "${hostname}")
if [[ "$result01" != "" ]]
thenecho "Configuration passed ^_^"
elseecho "hostname and ip not set,configuring......"echo "$hostip $hostname" >> /etc/hostsecho "configuration successful ^_^"
fi
echo "02 configuration successful ^_^"#3 firewall & selinux
echo '###03 Checking Firewall and SELinux###'
systemctl stop firewalld
systemctl disable firewalld
se01="SELINUX=disabled"
se02=$(cat /etc/selinux/config |grep -w "^SELINUX")
if [[ "$se01" == "$se02" ]]
thenecho "Configuration passed ^_^"
elseecho "SELinux Not Closed,configuring......"sed -i 's/^SELINUX=enforcing/SELINUX=disabled/g' /etc/selinux/configecho "configuration successful ^_^"
fi
echo "03 configuration successful ^_^"#4 swap
echo '###04 Checking swap###'
swapoff -a
sed -i "s/^.*swap/#&/g" /etc/fstab
echo "04 configuration successful ^_^"#5 docker-ce
echo '###05 Checking docker###'
yum-config-manager --add-repo http://mirrors.aliyun.com/docker-ce/linux/centos/docker-ce.repo
echo 'list docker-ce versions'
yum list docker-ce --showduplicates | sort -r
yum install -y docker-ce
systemctl start docker
systemctl enable docker
cat <<EOF > /etc/docker/daemon.json
{"registry-mirrors": ["https://cc2d8woc.mirror.aliyuncs.com"]
}
EOF
systemctl restart docker
echo "05 configuration successful ^_^"#6 iptables
echo '###06 Checking iptables###'
cat <<EOF > /etc/sysctl.d/k8s.conf
net.bridge.bridge-nf-call-ip6tables = 1
net.bridge.bridge-nf-call-iptables = 1
net.ipv4.ip_forward = 1
EOF
sysctl -p /etc/sysctl.d/k8s.conf
echo "06 configuration successful ^_^"#7 cgroup(systemd/cgroupfs)
echo '###07 Checking cgroup###'
containerd config default > /etc/containerd/config.toml
sed -i "s#registry.k8s.io/pause#registry.aliyuncs.com/google_containers/pause#g" /etc/containerd/config.toml
sed -i 's/SystemdCgroup = false/SystemdCgroup = true/g' /etc/containerd/config.toml
systemctl restart containerd
echo "07 configuration successful ^_^"#8 kubenetes.repo
echo '###08 Checking repo###'
cat <<EOF > /etc/yum.repos.d/kubernetes.repo
[kubernetes]
name=Kubernetes
baseurl=https://mirrors.aliyun.com/kubernetes/yum/repos/kubernetes-el7-x86_64/
enabled=1
gpgcheck=1
repo_gpgcheck=1
gpgkey=https://mirrors.aliyun.com/kubernetes/yum/doc/yum-key.gpg https://mirrors.aliyun.com/kubernetes/yum/doc/rpm-package-key.gpg
EOF
echo "08 configuration successful ^_^"#9 crictl
echo "Checking crictl"
cat <<EOF > /etc/crictl.yaml
runtime-endpoint: unix:///run/containerd/containerd.sock
image-endpoint: unix:///run/containerd/containerd.sock
timeout: 5
debug: false
EOF
echo "09 configuration successful ^_^"#10 kube1.27.0
echo "Checking kube"
yum install -y kubelet-1.27.0 kubeadm-1.27.0 kubectl-1.27.0 --disableexcludes=kubernetes
systemctl enable --now kubelet
echo "10 configuration successful ^_^"
echo "Congratulations ! The basic configuration has been completed"#11 Initialize the cluster
# 仅在master主机上做集群初始化
# kubeadm init --image-repository registry.aliyuncs.com/google_containers --kubernetes-version=v1.27.0 --pod-network-cidr=10.244.0.0/16
在三台节点上分别运行脚本
[root@kmaster ~]# sh Stream8-k8s-v1.27.0.sh
[root@knode1 ~]# sh Stream8-k8s-v1.27.0.sh
[root@knode2 ~]# sh Stream8-k8s-v1.27.0.sh# ***kmaster输出记录***
###00 Checking RPM###
CentOS Stream 8 - AppStream
CentOS Stream 8 - BaseOS
CentOS Stream 8 - Extras
CentOS Stream 8 - Extras common packages
Dependencies resolved.
=============================================================================================================================================================Package                                                                                    Architecture
=============================================================================================================================================================
Installing:bash-completion                  noarch                                                   net-tools                        x86_64
......略......Installed:conntrack-tools-1.4.4-11.el8.x86_64              cri-tools-1.26.0-0.x86_64             kubeadm-1.27.0-0.x86_64            kubectl-1.27.0-0.x86_64          libnetfilter_queue-1.0.4-3.el8.x86_64            socat-1.7.4.1-1.el8.x86_64           Complete!
Created symlink /etc/systemd/system/multi-user.target.wants/kubelet.service → /usr/lib/systemd/system/kubelet.service.
10 configuration successful ^_^
Congratulations ! The basic configuration has been completed# ***knode1和knode2输出记录与kmaster一致***
集群搭建
初始化集群(仅在master节点)
复制脚本中最后一段命令执行,进行
集群初始化
[root@kmaster ~]# kubeadm init --image-repository registry.aliyuncs.com/google_containers --kubernetes-version=v1.27.0 --pod-network-cidr=10.244.0.0/16
[init] Using Kubernetes version: v1.27.0
[preflight] Running pre-flight checks[WARNING FileExisting-tc]: tc not found in system path
[preflight] Pulling images required for setting up a Kubernetes cluster
[preflight] This might take a minute or two, depending on the speed of your internet connection
[preflight] You can also perform this action in beforehand using 'kubeadm config images pull'
W0719 10:48:35.823181   13745 images.go:80] could not find officially supported version of etcd for Kubernetes v1.27.0, falling back to the nearest etcd vers
W0719 10:48:51.007564   13745 checks.go:835] detected that the sandbox image "registry.aliyuncs.com/google_containers/pause:3.6" of the container runtime is
[certs] Using certificateDir folder "/etc/kubernetes/pki"
[certs] Generating "ca" certificate and key
[certs] Generating "apiserver" certificate and key
[certs] apiserver serving cert is signed for DNS names [kmaster kubernetes kubernetes.default kubernetes.default.svc kubernetes.default.svc.cluster.local] an
[certs] Generating "apiserver-kubelet-client" certificate and key
[certs] Generating "front-proxy-ca" certificate and key
[certs] Generating "front-proxy-client" certificate and key
[certs] Generating "etcd/ca" certificate and key
[certs] Generating "etcd/server" certificate and key
[certs] etcd/server serving cert is signed for DNS names [kmaster localhost] and IPs [192.168.100.150 127.0.0.1 ::1]
[certs] Generating "etcd/peer" certificate and key
[certs] etcd/peer serving cert is signed for DNS names [kmaster localhost] and IPs [192.168.100.150 127.0.0.1 ::1]
[certs] Generating "etcd/healthcheck-client" certificate and key
[certs] Generating "apiserver-etcd-client" certificate and key
[certs] Generating "sa" key and public key
[kubeconfig] Using kubeconfig folder "/etc/kubernetes"
[kubeconfig] Writing "admin.conf" kubeconfig file
[kubeconfig] Writing "kubelet.conf" kubeconfig file
[kubeconfig] Writing "controller-manager.conf" kubeconfig file
[kubeconfig] Writing "scheduler.conf" kubeconfig file
[kubelet-start] Writing kubelet environment file with flags to file "/var/lib/kubelet/kubeadm-flags.env"
[kubelet-start] Writing kubelet configuration to file "/var/lib/kubelet/config.yaml"
[kubelet-start] Starting the kubelet
[control-plane] Using manifest folder "/etc/kubernetes/manifests"
[control-plane] Creating static Pod manifest for "kube-apiserver"
[control-plane] Creating static Pod manifest for "kube-controller-manager"
[control-plane] Creating static Pod manifest for "kube-scheduler"
[etcd] Creating static Pod manifest for local etcd in "/etc/kubernetes/manifests"
W0719 10:49:09.467378   13745 images.go:80] could not find officially supported version of etcd for Kubernetes v1.27.0, falling back to the nearest etcd vers
[wait-control-plane] Waiting for the kubelet to boot up the control plane as static Pods from directory "/etc/kubernetes/manifests". This can take up to 4m0s
[apiclient] All control plane components are healthy after 8.059875 seconds
[upload-config] Storing the configuration used in ConfigMap "kubeadm-config" in the "kube-system" Namespace
[kubelet] Creating a ConfigMap "kubelet-config" in namespace kube-system with the configuration for the kubelets in the cluster
[upload-certs] Skipping phase. Please see --upload-certs
[mark-control-plane] Marking the node kmaster as control-plane by adding the labels: [node-role.kubernetes.io/control-plane node.kubernetes.io/exclude-from-e
[mark-control-plane] Marking the node kmaster as control-plane by adding the taints [node-role.kubernetes.io/control-plane:NoSchedule]
[bootstrap-token] Using token: ddct8j.i2dloykyc0wpwdg3
[bootstrap-token] Configuring bootstrap tokens, cluster-info ConfigMap, RBAC Roles
[bootstrap-token] Configured RBAC rules to allow Node Bootstrap tokens to get nodes
[bootstrap-token] Configured RBAC rules to allow Node Bootstrap tokens to post CSRs in order for nodes to get long term certificate credentials
[bootstrap-token] Configured RBAC rules to allow the csrapprover controller automatically approve CSRs from a Node Bootstrap Token
[bootstrap-token] Configured RBAC rules to allow certificate rotation for all node client certificates in the cluster
[bootstrap-token] Creating the "cluster-info" ConfigMap in the "kube-public" namespace
[kubelet-finalize] Updating "/etc/kubernetes/kubelet.conf" to point to a rotatable kubelet client certificate and key
[addons] Applied essential addon: CoreDNS
[addons] Applied essential addon: kube-proxyYour Kubernetes control-plane has initialized successfully!To start using your cluster, you need to run the following as a regular user:mkdir -p $HOME/.kubesudo cp -i /etc/kubernetes/admin.conf $HOME/.kube/configsudo chown $(id -u):$(id -g) $HOME/.kube/configAlternatively, if you are the root user, you can run:export KUBECONFIG=/etc/kubernetes/admin.confYou should now deploy a pod network to the cluster.
Run "kubectl apply -f [podnetwork].yaml" with one of the options listed at:https://kubernetes.io/docs/concepts/cluster-administration/addons/Then you can join any number of worker nodes by running the following on each as root:kubeadm join 192.168.129.200:6443 --token ddct8j.i2dloykyc0wpwdg3 \--discovery-token-ca-cert-hash sha256:3bdd47846f02bcc9858d2946714341f22b37aaa07dbaa61594f2a0ecce80f4fb
配置环境变量(仅在master节点)
# 根据安装提示,执行命令
[root@kmaster ~]#   mkdir -p $HOME/.kube
[root@kmaster ~]#   sudo cp -i /etc/kubernetes/admin.conf $HOME/.kube/config
[root@kmaster ~]#   sudo chown $(id -u):$(id -g) $HOME/.kube/config
[root@kmaster ~]# echo 'export KUBECONFIG=/etc/kubernetes/admin.conf' >> /etc/profile
[root@kmaster ~]# source /etc/profile[root@kmaster ~]# kubectl get nodes
NAME      STATUS   ROLES           AGE     VERSION
kmaster   NotReady    control-plane   2d23h   v1.27.
工作节点加入集群(knode1节点及knode2节点)
将初始化集群后,生成的
kubeadm join语句,分别拷贝到两个节点执行
# knode1节点
[root@knode1 ~]# kubeadm join 192.168.129.200:6443 --token ddct8j.i2dloykyc0wpwdg3 \--discovery-token-ca-cert-hash sha256:3bdd47846f02bcc9858d2946714341f22b37aaa07dbaa61594f2a0ecce80f4fb
[preflight] Running pre-flight checks[WARNING FileExisting-tc]: tc not found in system path
[preflight] Reading configuration from the cluster...
[preflight] FYI: You can look at this config file with 'kubectl -n kube-system get cm kubeadm-config -o yaml'
[kubelet-start] Writing kubelet configuration to file "/var/lib/kubelet/config.yaml"
[kubelet-start] Writing kubelet environment file with flags to file "/var/lib/kubelet/kubeadm-flags.env"
[kubelet-start] Starting the kubelet
[kubelet-start] Waiting for the kubelet to perform the TLS Bootstrap...This node has joined the cluster:
* Certificate signing request was sent to apiserver and a response was received.
* The Kubelet was informed of the new secure connection details.Run 'kubectl get nodes' on the control-plane to see this node join the cluster.# knode2节点
[root@knode2 ~]# kubeadm join 192.168.129.200:6443 --token ddct8j.i2dloykyc0wpwdg3 \--discovery-token-ca-cert-hash sha256:3bdd47846f02bcc9858d2946714341f22b37aaa07dbaa61594f2a0ecce80f4fb	[preflight] Running pre-flight checks[WARNING FileExisting-tc]: tc not found in system path
[preflight] Reading configuration from the cluster...
[preflight] FYI: You can look at this config file with 'kubectl -n kube-system get cm kubeadm-config -o yaml'
[kubelet-start] Writing kubelet configuration to file "/var/lib/kubelet/config.yaml"
[kubelet-start] Writing kubelet environment file with flags to file "/var/lib/kubelet/kubeadm-flags.env"
[kubelet-start] Starting the kubelet
[kubelet-start] Waiting for the kubelet to perform the TLS Bootstrap...This node has joined the cluster:
* Certificate signing request was sent to apiserver and a response was received.
* The Kubelet was informed of the new secure connection details.Run 'kubectl get nodes' on the control-plane to see this node join the cluster.[root@kmaster ~]# kubectl get nodes
NAME      STATUS   ROLES           AGE     VERSION
kmaster   NotReady    control-plane   2d23h   v1.27.0
knode1    NotReady    <none>          2d23h   v1.27.0
knode2    NotReady    <none>          2d23h   v1.27.0
安装calico网络(仅master节点)
安装网络组件前,集群状态为
NotReady,安装后,稍等片刻,集群状态将变为Ready。
查看集群状态
[root@kmaster ~]# kubectl get nodes
NAME      STATUS   ROLES           AGE     VERSION
kmaster   NotReady    control-plane   2d23h   v1.27.0
knode1    NotReady    <none>          2d23h   v1.27.0
knode2    NotReady    <none>          2d23h   v1.27.0
安装 Tigera Calico operator,版本 3.26
# 所需文件可在百度网盘自行获取
[root@kmaster ~]# kubectl create -f tigera-operator-3-26-1.yaml
namespace/tigera-operator created
customresourcedefinition.apiextensions.k8s.io/bgpconfigurations.crd.projectcalico.org created
customresourcedefinition.apiextensions.k8s.io/bgpfilters.crd.projectcalico.org created
customresourcedefinition.apiextensions.k8s.io/bgppeers.crd.projectcalico.org created
customresourcedefinition.apiextensions.k8s.io/blockaffinities.crd.projectcalico.org created
customresourcedefinition.apiextensions.k8s.io/caliconodestatuses.crd.projectcalico.org created
customresourcedefinition.apiextensions.k8s.io/clusterinformations.crd.projectcalico.org created
customresourcedefinition.apiextensions.k8s.io/felixconfigurations.crd.projectcalico.org created
customresourcedefinition.apiextensions.k8s.io/globalnetworkpolicies.crd.projectcalico.org created
customresourcedefinition.apiextensions.k8s.io/globalnetworksets.crd.projectcalico.org created
customresourcedefinition.apiextensions.k8s.io/hostendpoints.crd.projectcalico.org created
customresourcedefinition.apiextensions.k8s.io/ipamblocks.crd.projectcalico.org created
customresourcedefinition.apiextensions.k8s.io/ipamconfigs.crd.projectcalico.org created
customresourcedefinition.apiextensions.k8s.io/ipamhandles.crd.projectcalico.org created
customresourcedefinition.apiextensions.k8s.io/ippools.crd.projectcalico.org created
customresourcedefinition.apiextensions.k8s.io/ipreservations.crd.projectcalico.org created
customresourcedefinition.apiextensions.k8s.io/kubecontrollersconfigurations.crd.projectcalico.org created
customresourcedefinition.apiextensions.k8s.io/networkpolicies.crd.projectcalico.org created
customresourcedefinition.apiextensions.k8s.io/networksets.crd.projectcalico.org created
customresourcedefinition.apiextensions.k8s.io/apiservers.operator.tigera.io created
customresourcedefinition.apiextensions.k8s.io/imagesets.operator.tigera.io created
customresourcedefinition.apiextensions.k8s.io/installations.operator.tigera.io created
customresourcedefinition.apiextensions.k8s.io/tigerastatuses.operator.tigera.io created
serviceaccount/tigera-operator created
clusterrole.rbac.authorization.k8s.io/tigera-operator created
clusterrolebinding.rbac.authorization.k8s.io/tigera-operator created
deployment.apps/tigera-operator created
配置
custom-resources.yaml
[root@kmaster ~]# vim custom-resources-3-26-1.yaml
# 更改IP地址池中的 CIDR,和 kubeadm 初始化集群中的 --pod-network-cidr 参数保持一致(配置文件已做更改)
# cidr: 10.244.0.0/16# 所需文件可在百度网盘自行获取
[root@kmaster ~]# kubectl create -f custom-resources-3-26-1.yaml
installation.operator.tigera.io/default created
apiserver.operator.tigera.io/default created# 动态查看calico容器状态,待全部running后,集群状态变为正常
[root@kmaster ~]# watch kubectl get pods -n calico-system
NAME                                       READYSTATUS    RESTARTS	  AGE
calico-kube-controllers-5d6c98ff78-gcj2n   1/1Running   3 (103m ago)   2d23h
calico-node-cc9ct                          1/1Running   3 (103m ago)   2d23h
calico-node-v8459                          1/1Running   3 (103m ago)   2d23h
calico-node-w524w                          1/1Running   3 (103m ago)   2d23h
calico-typha-bbb96d56-46w2v                1/1Running   3 (103m ago)   2d23h
calico-typha-bbb96d56-nrxkf                1/1Running   3 (103m ago)   2d23h
csi-node-driver-4wm4h                      2/2Running   6 (103m ago)   2d23h
csi-node-driver-dr7hq                      2/2Running   6 (103m ago)   2d23h
csi-node-driver-fjr77                      2/2Running   6 (103m ago)   2d23h
再次查看集群状态
[root@kmaster ~]# kubectl get nodes
NAME      STATUS   ROLES           AGE     VERSION
kmaster   Ready    control-plane   2d23h   v1.27.0
knode1    Ready    <none>          2d23h   v1.27.0
knode2    Ready    <none>          2d23h   v1.27.
·END
2
Running 6 (103m ago) 2d23h
csi-node-driver-dr7hq 2/2
Running 6 (103m ago) 2d23h
csi-node-driver-fjr77 2/2
Running 6 (103m ago) 2d23h
> 再次查看集群状态```bash
[root@kmaster ~]# kubectl get nodes
NAME      STATUS   ROLES           AGE     VERSION
kmaster   Ready    control-plane   2d23h   v1.27.0
knode1    Ready    <none>          2d23h   v1.27.0
knode2    Ready    <none>          2d23h   v1.27.
·END