上海市城乡和住房建设厅网站引擎搜索下载
Kotlin 案例1. recyclerView:显示列表
这里,我们将通过几个案例来介绍如何使用recyclerView。RecyclerView 是 ListView 的高级版本。 当我们有很长的项目列表需要显示的时候,我们就可以使用 RecyclerView。 它具有重用其视图的能力。 在 RecyclerView 中,当 View 离开屏幕或对用户不可见时,它不会被销毁,这些视图会被重用。 此功能有助于降低功耗并为应用程序提供更高的响应能力。
- IDE: Android Studio
- Language: Kotlin
- Key words: Determinate ProgressBar, Indeterminate ProgressBar
- API tested: 32
- 完整代码下载地址:
文章目录
- Kotlin 案例1. recyclerView:显示列表
- 1 结果
- 2 总结
- 3 准备
- 4 activity_main.xml
- 5 item_main.xml
- 6 ItemClickListener.kt
- 7 MainAdapter.kt
- 8 MainActivity.kt
1 结果
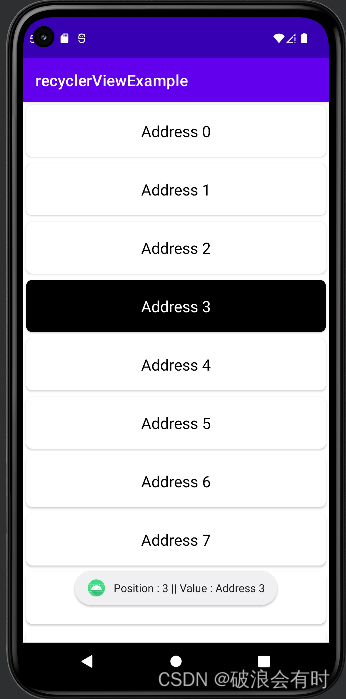
这个案例本身比较简单。但通过这个案例,我们可以用最直白地方式解释 RecyclerView 的使用方式。APP 启动后,界面会显示一个地址列表,当我们点击列表中的任何一项后,系统会弹出 Toast 提示:Position: X || Value: Address X。
2 总结
通过这个案例,我们可以先进行一个简单的总结:如果我们要建一个 RecyclerView,我们起码需要哪些东西。
- 需要显示列表的xml界面,我们需要有一个
<androidx.recyclerview.widget.RecyclerView />模块; - 一个列表有一项项item组成,我们需要有一个xml文件去描述这个item。在这个例子中,对应的是
item_main.xml; - RecyclerView 最起码需要一个
adaptor类,它包含了三个函数:onCreateViewHolder():此函数新建View以返回ViewHolder;onBindViewHolder():该函数用于将列表项绑定到我们的各个部件,如TextView、ImageView等。getItemCount():它返回列表中存在的项目的计数。
- 当然,最后,我们需要在显示列表的xml界面调用上面这个
adaptor类,行程列表。
3 准备
我们在android studio中新建一个项目,如下为我的AndroidManifest.xml, build_gradle (Project)以及build_gradle (app)的代码。
AndroidManifest.xml
<?xml version="1.0" encoding="utf-8"?>
<manifest xmlns:android="http://schemas.android.com/apk/res/android"xmlns:tools="http://schemas.android.com/tools"package="com.example.RecyclerViewAddressListEx"><applicationandroid:allowBackup="true"android:dataExtractionRules="@xml/data_extraction_rules"android:fullBackupContent="@xml/backup_rules"android:icon="@mipmap/ic_launcher"android:label="@string/app_name"android:roundIcon="@mipmap/ic_launcher_round"android:supportsRtl="true"android:theme="@style/Theme.RecyclerViewAddressListEx"tools:targetApi="31"><activityandroid:name=".MainActivity"android:exported="true"><intent-filter><action android:name="android.intent.action.MAIN" /><category android:name="android.intent.category.LAUNCHER" /></intent-filter></activity></application></manifest>
注意,我这里给项目命名为 RecyclerViewAddressListEx。
build_gradle (Project)
// Top-level build file where you can add configuration options common to all sub-projects/modules.
plugins {id 'com.android.application' version '7.2.1' apply falseid 'com.android.library' version '7.2.1' apply falseid 'org.jetbrains.kotlin.android' version '1.6.10' apply false
}task clean(type: Delete) {delete rootProject.buildDir
}
build_gradle (app)
plugins {id 'com.android.application'id 'org.jetbrains.kotlin.android'
}android {compileSdk 32defaultConfig {applicationId "com.example.recyclerviewexample"minSdk 26targetSdk 32versionCode 1versionName "1.0"testInstrumentationRunner "androidx.test.runner.AndroidJUnitRunner"}buildTypes {release {minifyEnabled falseproguardFiles getDefaultProguardFile('proguard-android-optimize.txt'), 'proguard-rules.pro'}}compileOptions {sourceCompatibility JavaVersion.VERSION_1_8targetCompatibility JavaVersion.VERSION_1_8}kotlinOptions {jvmTarget = '1.8'}
}dependencies {implementation 'androidx.core:core-ktx:1.8.0'implementation 'androidx.appcompat:appcompat:1.4.2'implementation 'com.google.android.material:material:1.6.1'implementation 'androidx.constraintlayout:constraintlayout:2.1.4'testImplementation 'junit:junit:4.13.2'androidTestImplementation 'androidx.test.ext:junit:1.1.3'androidTestImplementation 'androidx.test.espresso:espresso-core:3.4.0'
}
4 activity_main.xml
我们将 RecyclerView 添加到 activity_main.xml 试图中。
<?xml version="1.0" encoding="utf-8"?>
<androidx.constraintlayout.widget.ConstraintLayout xmlns:android="http://schemas.android.com/apk/res/android"xmlns:app="http://schemas.android.com/apk/res-auto"xmlns:tools="http://schemas.android.com/tools"android:layout_width="match_parent"android:layout_height="match_parent"tools:context=".MainActivity"><androidx.recyclerview.widget.RecyclerViewandroid:layout_width="match_parent"android:layout_height="match_parent"android:id="@+id/recycler_view"tools:listitem="@layout/item_main"/></androidx.constraintlayout.widget.ConstraintLayout>
注意上面一行:tools:listitem="@layout/item_main",也就是说,对于 RecyclerView ,它是由一行行的 item 构成的,这个 item 的试图就在 item_main.xml 中填写。
5 item_main.xml
新建 item_main.xml (右键layout > New > Layout Resource File),
<?xml version="1.0" encoding="utf-8"?>
<androidx.cardview.widget.CardViewxmlns:android="http://schemas.android.com/apk/res/android"android:layout_width="match_parent"android:layout_height="wrap_content"xmlns:app="http://schemas.android.com/apk/res-auto"android:id="@+id/card_view"android:layout_margin="4dp"app:cardCornerRadius="8dp"><TextViewandroid:layout_width="match_parent"android:layout_height="wrap_content"android:id="@+id/text_View"android:textSize="20sp"android:padding="20dp"android:gravity="center"/></androidx.cardview.widget.CardView>
这里,每一个 item 由 TextView 构成。我们也可以添加 ImageView 或者其他元素。
6 ItemClickListener.kt
该文件将保存我们要在 RecyclerView 中显示的每个项目的信息,也就是说,我们点了这个按钮之后会发生什么。
interface ItemClickListener {fun onClick(position: Int, value: String?)
}
这里,我们只是定义了一个接口,然后定义了一个 onClick 函数。具体的实现在 MainActivity.kt 中。
7 MainAdapter.kt
这里我们需要创建一个 adaptor 类,此类包含一些与 RecyclerView 一起使用的重要功能,如下所示:
onCreateViewHolder():此函数新建View以返回ViewHolder;onBindViewHolder():该函数用于将列表项绑定到我们的各个部件,如TextView、ImageView等。getItemCount():它返回列表中存在的项目的计数。
MainAdapter.kt 代码如下:
package com.example.recyclerviewaddresslisteximport android.graphics.Color
import android.view.LayoutInflater
import android.view.View
import android.view.ViewGroup
import android.widget.TextView
import androidx.cardview.widget.CardView
import androidx.recyclerview.widget.RecyclerViewclass MainAdapter     // create constructor(// initialize variablesvar arrayList: ArrayList<String>, var itemClickListener: ItemClickListener
) :RecyclerView.Adapter<MainAdapter.ViewHolder>() {var selectedPosition = -1// create new viewsoverride fun onCreateViewHolder(parent: ViewGroup, viewType: Int): ViewHolder {// inflates the card_view_design view// that is used to hold list itemval view: View = LayoutInflater.from(parent.context).inflate(R.layout.item_main, parent, false)// return holderreturn ViewHolder(view)}// binds the list items to a viewoverride fun onBindViewHolder(holder: ViewHolder, position: Int) {// set value on text viewholder.textView.text = arrayList[position]holder.itemView.setOnClickListener(object : View.OnClickListener {override fun onClick(v: View?) {// get adapter positionval position = holder.adapterPosition// call listeneritemClickListener.onClick(position, arrayList[position])// update positionselectedPosition = position// notifynotifyDataSetChanged()}})// check conditionsif (selectedPosition == position) {// When current position is equal// to selected position// set black background colorholder.cardView.setCardBackgroundColor(Color.parseColor("#000000"))// set white text colorholder.textView.setTextColor(Color.parseColor("#FFFFFF"))} else {// when current position is different// set white backgroundholder.cardView.setCardBackgroundColor(Color.parseColor("#FFFFFF"))// set black text colorholder.textView.setTextColor(Color.parseColor("#000000"))}}// return the number of the items in the listoverride fun getItemCount(): Int {// return array list sizereturn arrayList.size}// Holds the views for adding it to image and textinner class ViewHolder(itemView: View) : RecyclerView.ViewHolder(itemView) {// initialize variablevar cardView: CardViewvar textView: TextViewinit {// assign variablecardView = itemView.findViewById(R.id.card_view)textView = itemView.findViewById(R.id.text_View)}}
}
8 MainActivity.kt
import androidx.appcompat.app.AppCompatActivity
import android.os.Bundle
import android.widget.Toast
import androidx.recyclerview.widget.LinearLayoutManager
import androidx.recyclerview.widget.RecyclerViewclass MainActivity : AppCompatActivity() {// initialize variableprivate lateinit var recyclerView: RecyclerViewvar arrayList: ArrayList<String> = ArrayList()var adapter: MainAdapter? = nullvar itemClickListener: ItemClickListener? = nulloverride fun onCreate(savedInstanceState: Bundle?) {super.onCreate(savedInstanceState)setContentView(R.layout.activity_main)// getting the recyclerview by its idrecyclerView=findViewById(R.id.recycler_view);// getting the recyclerview by its id// use for loop// use for loopfor (i in 0..14) {// add values in array listarrayList.add("Address $i")}// Initialize listener// Initialize listeneritemClickListener = object : ItemClickListener {override fun onClick(position: Int, value: String?) {// Display toastToast.makeText(applicationContext, "Position : "+ position + " || Value : " + value, Toast.LENGTH_SHORT).show()}}// this creates a vertinullcal layout ManagerrecyclerView.layoutManager = LinearLayoutManager(this)// Initialize adapteradapter = MainAdapter(arrayList, itemClickListener as ItemClickListener)// set adapterrecyclerView.adapter = adapter}
}
上面代码中的 arrayList 其实就是最终呈现在 RecyclerView 视图中的 TextView 的集合。
for (i in 0..14) {// add values in array listarrayList.add("Address $i")
}
另外,这里也定义了按下按钮后的反馈:
// Initialize listener
itemClickListener = object : ItemClickListener {override fun onClick(position: Int, value: String?) {// Display toastToast.makeText(applicationContext, "Position : "+ position + " || Value : " + value, Toast.LENGTH_SHORT).show()}
}
最后我们设置adaptor:
// Initialize adapter
adapter = MainAdapter(arrayList, itemClickListener as ItemClickListener)
// set adapter
recyclerView.adapter = adapter