网站建设要求 优帮云个人推广网站
目录
- 一、初始Rabbitmq
- 1、什么是Rabbitmq,它的概述是什么?
- 2、RabbitMQ的应用场景
- 3、RabbitMQ主要组件
- 4、RabbitMQ 的优点
- 5、与其他消息队列性能比较
- 二、RabbitMQ环境安装初始化
- 三、SpringAMQP+RabbitMQ实战入门(基本API)
- 1、实战入门(Java API)
- 一、WorkQueues模型
- 二、交换机类型
- 1、Fanout交换机
- 2、Direct交换机
- 3、Topic交换机
- 三、基于注解声明
一、初始Rabbitmq
1、什么是Rabbitmq,它的概述是什么?
RabbitMQ 是一个开源的消息队列中间件,作为消息代理(Message Broker)实现,它负责在不同的应用程序、服务或组件之间传递消息。RabbitMQ 实现了 AMQP(Advanced Message Queuing Protocol)协议,支持可靠的消息传递,确保消息能够在系统中被可靠、顺序地传递,并支持异步和解耦合的通信方式。 其中消息传递的基本模型可以分为 点对点(Point-to-Point) 和 发布/订阅(Publish/Subscribe) 两种类型。
2、RabbitMQ的应用场景
-
异步处理: RabbitMQ 非常适合需要异步处理的场景。例如,在电商网站中,订单生成后需要异步处理支付、发货等任务,生产者将消息发送到 RabbitMQ,消费者异步处理这些任务。
-
分布式系统通信解耦: RabbitMQ 可以用作分布式系统中各个服务之间的通信媒介,服务之间通过消息队列进行解耦,避免直接调用和依赖。
-
事件驱动架构(EDA): 在事件驱动架构中,RabbitMQ 可以作为事件总线,消费者根据事件类型处理不同的业务逻辑。
-
日志收集与分析: RabbitMQ 可以用于收集和转发日志信息,将日志从不同的系统组件传递到中央日志处理系统。
3、RabbitMQ主要组件
-
publisher:生产者,也就是发送消息的一方
-
consumer:消费者,也就是消费消息的一方
-
queue:队列,存储消息。生产者投递的消息会暂存在消息队列中,等待消费者处理
-
exchange:交换机,负责消息路由。生产者发送的消息由交换机决定投递到哪个队列。
-
Binding(绑定):交换机和队列之间的联系,定义了交换机将消息路由到队列的规则。
-
Message(消息):在生产者和消费者之间传递的数据,通常包括消息体和一些元数据(如路由键、消息头等)。
4、RabbitMQ 的优点
- 解耦合:生产者和消费者之间不直接交互,它们通过队列进行消息交换,从而解耦应用程序的各个组件。
- 异步处理:RabbitMQ 支持异步消息传递,允许系统在接收请求时立即响应,并在后台处理任务。
- 可靠性:支持消息持久化、消息确认等功能,确保消息不会丢失。
- 扩展性:通过集群和镜像队列,RabbitMQ 可以扩展到多个节点,提供高可用性和负载均衡。
- 多协议支持:虽然 RabbitMQ 基于 AMQP,但它还可以通过插件支持其他协议,如 MQTT、STOMP 等。
5、与其他消息队列性能比较

- 追求可用性:Kafka、 RocketMQ 、RabbitMQ
- 追求可靠性:RabbitMQ、RocketMQ
- 追求吞吐能力:RocketMQ、Kafka
- 追求消息低延迟:RabbitMQ、Kafka
据统计,目前国内消息队列使用最多的还是RabbitMQ,再加上其各方面都比较均衡,稳定性也好,因此我们课堂上选择RabbitMQ来学习。
二、RabbitMQ环境安装初始化
RabbitMQ详情安装教程地址:教程安装地址
三、SpringAMQP+RabbitMQ实战入门(基本API)
将来我们开发业务功能的时候,肯定不会在控制台收发消息,而是应该基于编程的方式。由于RabbitMQ采用了AMQP协议,因此它具备跨语言的特性。任何语言只要遵循AMQP协议收发消息,都可以与RabbitMQ交互。并且RabbitMQ官方也提供了各种不同语言的客户端。 但是,RabbitMQ官方提供的Java客户端编码相对复杂,一般生产环境下我们更多会结合Spring来使用。而Spring的官方刚好基于RabbitMQ提供了这样一套消息收发的模板工具:SpringAMQP。并且还基于SpringBoot对其实现了自动装配,使用起来非常方便。
Spring AMQP 的官方地址: Spring AMQP SpringAMQP提供了三个功能:
- 自动声明队列、交换机及其绑定关系
- 基于注解的监听器模式,异步接收消息
- 封装了RabbitTemplate工具,用于发送消息
1、实战入门(Java API)
导入依赖
<!--AMQP依赖,包含RabbitMQ-->
<dependency><groupId>org.springframework.boot</groupId><artifactId>spring-boot-starter-amqp</artifactId>
</dependency>
一、WorkQueues模型
Work queues,任务模型。简单来说就是让多个消费者绑定到一个队列,共同消费队列中的消息.
当消息处理比较耗时的时候,可能生产消息的速度会远远大于消息的消费速度。长此以往,消息就会堆积越来越多,无法及时处理。 此时就可以使用work 模型,多个消费者共同处理消息处理,消息处理的速度就能大大提高了。
1)声明队列
@Configuration
public class FanoutConfig {/*** 第1个队列*/@Beanpublic Queue fanoutQueue1(){return new Queue("simple.queue");}
}
2)消息发送
这次我们往队列中循环发送,模拟出一个大量消息堆积的队列。
/*** workQueue* 向队列中不停发送消息,模拟消息堆积。*/
@Test
public void testWorkQueue() throws InterruptedException {// 队列名称String queueName = "simple.queue";// 消息String message = "hello, message_";for (int i = 0; i < 50; i++) {// 发送消息,每20毫秒发送一次,相当于每秒发送50条消息rabbitTemplate.convertAndSend(queueName, message + i);Thread.sleep(20);}
}
3) 消息接收
要模拟多个消费者绑定同一个队列,我们在consumer服务的SpringRabbitListener中添加2个新的方法(其中**@RabbitListener**用来监听队列):
@RabbitListener(queues = "work.queue")
public void listenWorkQueue1(String msg) throws InterruptedException {System.out.println("消费者1接收到消息:【" + msg + "】" + LocalTime.now());Thread.sleep(20);
}@RabbitListener(queues = "work.queue")
public void listenWorkQueue2(String msg) throws InterruptedException {System.err.println("消费者2........接收到消息:【" + msg + "】" + LocalTime.now());Thread.sleep(200);
}
注意到这两消费者,都设置了Thead.sleep,模拟任务耗时:
消费者1 sleep了20毫秒,相当于每秒钟处理50个消息
消费者2 sleep了200毫秒,相当于每秒处理5个消息
4)测试
启动ConsumerApplication后,在执行publisher服务中刚刚编写的发送测试方法testWorkQueue。 最终结果如下:
消费者1和消费者2竟然每人消费了25条消息:
消费者1很快完成了自己的25条消息
消费者2却在缓慢的处理自己的25条消息。
也就是说消息是平均分配给每个消费者,并没有考虑到消费者的处理能力。**导致1个消费者空闲,另一个消费者忙的不可开交。**没有充分利用每一个消费者的能力,最终消息处理的耗时远远超过了1秒。这样显然是有问题的。
5)能者多劳
在spring中有一个简单的配置,可以解决这个问题。我们修改consumer服务的application.yml文件,添加配置:
spring:rabbitmq:listener:simple:prefetch: 1 # 每次只能获取一条消息,处理完成才能获取下一个消息
在配置中,prefetch: 1表示每个消费者每次只能从队列中预取1个消息,消费完就能拿下一次,不需要等轮询(RabbitMQ默认是轮询)。它可以帮助保证每个消息在被消费者处理时都能得到较为均匀的分配,避免某个消费者处理速度慢而导致其他消费者空闲的情况。如果不配置的话,那么RabbitMQ采用的就是一个公平轮询的方式,将消息依次发给一个消费,等他消费完了再发下一个给另外的消费者
二、交换机类型
之前的WorkQueues模型并没有交换机,引入交换机后,消息发送和接收的模式就会有很大的变化,模型如下所示

-
Publisher:生产者,不再发送消息到队列中,而是发给交换机
-
Exchange:交换机,一方面,接收生产者发送的消息。另一方面,知道如何处理消息,例如递交给某个特别队列、递交给所有队列、或是将消息丢弃。到底如何操作,取决于Exchange选的类型。
-
Queue:消息队列,接收消息、缓存消息。不过队列一定要与交换机绑定。
-
Consumer:消费者,订阅队列。
1、Fanout交换机
Fanout,在MQ中叫广播,在广播的模式下,消息发送的流程如下图所示

其主要特点:
1) 可以有多个队列
2) 每个队列都可以绑定到Exchange(交换机)
3) 生产者发送的消息,只能发送到交换机
4) 交换机把消息发送给绑定过的所有队列
5) 订阅队列的消费者都能拿到消息
案例演示
1)声明交换机和对应的队列,并进行绑定
    /*** 声明交换机*/@Beanpublic FanoutExchange fanoutExchange(){return new FanoutExchange("xuyuan.fanout");}/*** 第1个队列*/@Beanpublic Queue fanoutQueue1(){return new Queue("fanout.queue1");}/*** 第2个队列*/@Beanpublic Queue fanoutQueue2(){return new Queue("fanout.queue2");}
/*** 绑定队列和交换机*/@Beanpublic Binding bindingQueue1(Queue fanoutQueue1, FanoutExchange fanoutExchange){return BindingBuilder.bind(fanoutQueue1).to(fanoutExchange);}/*** 绑定队列和交换机*/@Beanpublic Binding bindingQueue2(Queue fanoutQueue2, FanoutExchange fanoutExchange){return BindingBuilder.bind(fanoutQueue2).to(fanoutExchange);}
2)生产者发送消息
@Test
public void testFanoutExchange() {// 交换机名称String exchangeName = "xuyuan.fanout";// 消息String message = "hello, xuyuan ,nihao!";rabbitTemplate.convertAndSend(exchangeName, "", message);
}
3)消费者接收消息
@RabbitListener(queues = "fanout.queue1")
public void listenFanoutQueue1(String msg) {System.out.println("消费者1接收到Fanout消息:【" + msg + "】");
}
@RabbitListener(queues = "fanout.queue2")
public void listenFanoutQueue2(String msg) {System.out.println("消费者2接收到Fanout消息:【" + msg + "】");
}
分析总结:
交换机的作用主要是:
- 接收对应Publisher发送的消息
- 将消息按照规则路由道与之绑定的队列
- 不能缓存消息,路由失败,消息丢失
- FanoutExchange会将消息路由到每个绑定的队列。
2、Direct交换机
场景:在Fanout模式中,一条消息,会被所有订阅的队列都消费。但是,在某些场景下,我们希望不同的消息被不同的队列消费。这时就要用到Direct类型的Exchange。

在Direct模型下:
- 队列与交换机的绑定,不能是任意绑定的,需要指定一个Routingkey(路由key)
- 消息的发送方在向Exchange发送消息时,也必须指定消息的RoutingKey。
- Exchange不在把消息发送给每一个绑定的队列,而是根据消息的RoutingKey来发送到指定的队列中去。然后消费者监听对应的队列得到消息。
案例如下:
@Configuration
public class DirectConfig {/*** 声明交换机* @return Direct类型交换机*/@Beanpublic DirectExchange directExchange(){return ExchangeBuilder.directExchange("hmall.direct").build();}/*** 第1个队列*/@Beanpublic Queue directQueue1(){return new Queue("direct.queue1");}/*** 绑定队列和交换机*/@Beanpublic Binding bindingQueue1WithRed(Queue directQueue1, DirectExchange directExchange){return BindingBuilder.bind(directQueue1).to(directExchange).with("red");}/*** 绑定队列和交换机*/@Beanpublic Binding bindingQueue1WithBlue(Queue directQueue1, DirectExchange directExchange){return BindingBuilder.bind(directQueue1).to(directExchange).with("blue");}/*** 第2个队列*/@Beanpublic Queue directQueue2(){return new Queue("direct.queue2");}/*** 绑定队列和交换机*/@Beanpublic Binding bindingQueue2WithRed(Queue directQueue2, DirectExchange directExchange){return BindingBuilder.bind(directQueue2).to(directExchange).with("red");}/*** 绑定队列和交换机*/@Beanpublic Binding bindingQueue2WithYellow(Queue directQueue2, DirectExchange directExchange){return BindingBuilder.bind(directQueue2).to(directExchange).with("yellow");}
}
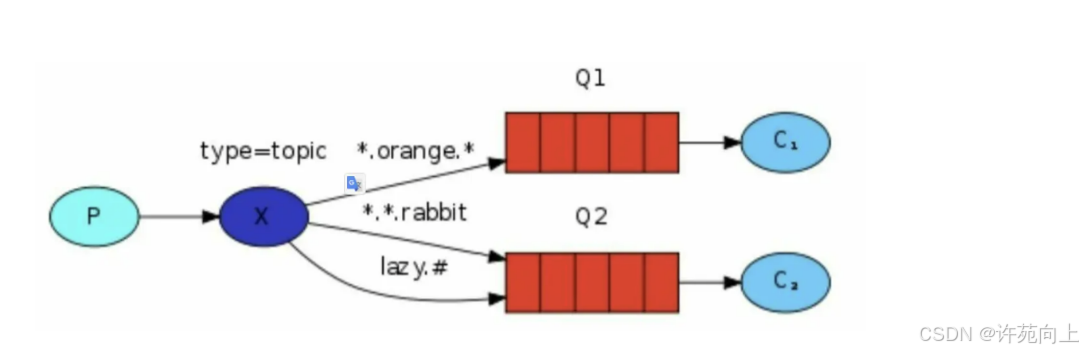
3、Topic交换机
分析:
使用Direct可以根据对应的RoutingKey路由到指定的队列,但是对于多元组就比较麻烦,只能一个一个绑定对应的RoutingKey,此时Topic交换机就派上用场了,可以同时划分一个子组,一个消息可以根据一个组别的队列进行投递,就需要用到Topic交换机
Topic类型Exchange可以让队列在绑定BindingKey 的时候使用通配符!
BindingKey 一般都是有一个或多个单词组成,多个单词之间以“ .”分割,例如: item.insert
通配符规则:
#:匹配一个或多个词
*:只匹配1个词
举例子:
- xuyuan.# :它能够匹配xuyuan.com 或者xuyuan.xxx.xx等等
xuyuan.* :只能匹配xuyuan.aa 或者xuyuan.xx
1)初始化
@Configuration
public class Topic {/*** 声明交换机* @return Topic类型交换机*/@Beanpublic TopicExchange topicExchange(){return ExchangeBuilder.topicExchange("xuyuan.topic").build();}/*** 第1个队列*/@Beanpublic Queue topicQueue1(){return new Queue("topic.queue1");}/*** 绑定队列和交换机*/@Beanpublic Binding bindingQueue1WithRed(Queue topicQueue1, TopicExchange topicExchange){return BindingBuilder.bind(topicQueue1).to(topicExchange).with("xuyuan.new");}/*** 绑定队列和交换机*/@Beanpublic Binding bindingQueue1WithBlue(Queue topicQueue1, TopicExchange topicExchange){return BindingBuilder.bind(topicQueue1).to(topicExchange).with("xuyuan.#");}/*** 第2个队列*/@Beanpublic Queue topicQueue2(){return new Queue("topic.queue2");}/*** 绑定队列和交换机*/@Beanpublic Binding bindingQueue2WithRed(Queue topicQueue2, TopicExchange topicExchange){return BindingBuilder.bind(topicQueue2).to(topicExchange).with("ooyl.*");}/*** 绑定队列和交换机*/@Beanpublic Binding bindingQueue2WithYellow(Queue topicQueue2, TopicExchange topicExchange){return BindingBuilder.bind(topicQueue2).to(topicExchange).with("ooyl.#");}
}
2)消息发送
/*** topicExchange*/
@Test
public void testSendTopicExchange() {// 交换机名称String exchangeName = "hmall.topic";// 消息String message = "许苑2上某个人";// 发送消息rabbitTemplate.convertAndSend(exchangeName, "xuyuan.news", message);
}
3)消息接收
@RabbitListener(queues = "topic.queue1")
public void listenTopicQueue1(String msg){System.out.println("消费者1接收到topic.queue1的消息:【" + msg + "】");
}
@RabbitListener(queues = "topic.queue2")
public void listenTopicQueue2(String msg){System.out.println("消费者2接收到topic.queue2的消息:【" + msg + "】");
}
总结
下Direct交换机与Topic交换机的差异如下:
Topic交换机接收的消息RoutingKey必须是多个单词,以 . 分割
Topic交换机与队列绑定时的bindingKey可以指定通配符
#:代表0个或多个词
*:代表1个词
三、基于注解声明
基于@Bean的方式声明队列和交换机比较麻烦,Spring还提供了基于注解方式来声明。
例如,我们同样声明Direct模式的交换机和队列:
@RabbitListener(bindings = @QueueBinding(value = @Queue(name = "direct.queue1"),exchange = @Exchange(name = "hmall.direct", type = ExchangeTypes.DIRECT),key = {"red", "blue"}
))
public void listenDirectQueue1(String msg){System.out.println("消费者1接收到direct.queue1的消息:【" + msg + "】");
}@RabbitListener(bindings = @QueueBinding(value = @Queue(name = "direct.queue2"),exchange = @Exchange(name = "hmall.direct", type = ExchangeTypes.DIRECT),key = {"red", "yellow"}
))
public void listenDirectQueue2(String msg){System.out.println("消费者2接收到direct.queue2的消息:【" + msg + "】");
}
是不是简单多了。 再试试Topic模式:
@RabbitListener(bindings = @QueueBinding(value = @Queue(name = "topic.queue1"),exchange = @Exchange(name = "hmall.topic", type = ExchangeTypes.TOPIC),key = "china.#"
))
public void listenTopicQueue1(String msg){System.out.println("消费者1接收到topic.queue1的消息:【" + msg + "】");
}@RabbitListener(bindings = @QueueBinding(value = @Queue(name = "topic.queue2"),exchange = @Exchange(name = "hmall.topic", type = ExchangeTypes.TOPIC),key = "#.news"
))
public void listenTopicQueue2(String msg){System.out.println("消费者2接收到topic.queue2的消息:【" + msg + "】");
}